


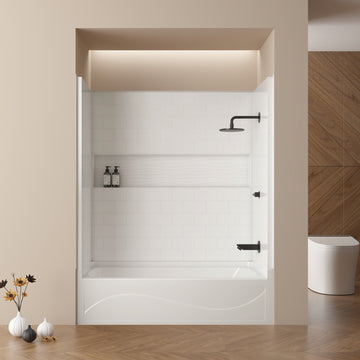


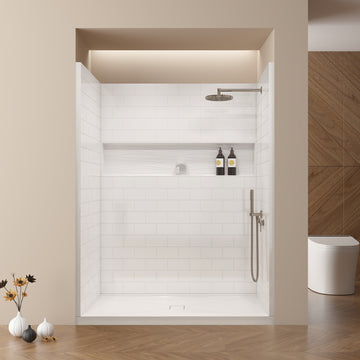


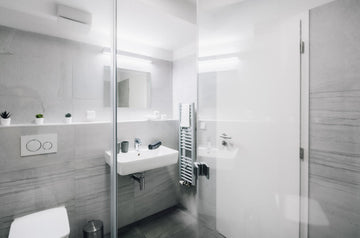
Shower enclosures have become the go-to solution for homeowners looking to upgrade their bathrooms with a modern, functional touch. Unlike shower curtains that cling and collect mildew, these permanent fixtures create a defined shower space while keeping water where it belongs.
Whether you're renovating a master bathroom or maximizing a compact corner, choosing the right enclosure can transform your daily routine and boost your home's value.
This guide breaks down everything you need to know about shower enclosures, helping you navigate materials, styles, and installation requirements to find the perfect match for your space and budget.
What is a shower enclosure?
A shower enclosure is a permanent structure that creates a dedicated shower space within your bathroom, consisting of walls, doors, and a base that work together to contain water spray. These installations typically combine panels made from glass, acrylic, or composite materials with metal framing and hardware to form a watertight barrier around your shower area.
Unlike temporary solutions, shower enclosures integrate seamlessly with your bathroom's plumbing and architecture, becoming a fixed part of the room's design.
Shower enclosures deliver practical advantages that shower curtains simply can't match. They eliminate the annoying curtain cling that happens mid-shower and prevent water from splashing onto bathroom floors, reducing slip hazards and water damage. The solid barrier also improves temperature retention, keeping steam and warmth inside for a more comfortable experience.
From a hygiene standpoint, glass and acrylic surfaces resist mold and mildew growth better than fabric curtains, requiring less frequent replacement. Plus, shower enclosures add substantial resale value to your home—real estate professionals estimate a 70% return on investment for quality bathroom upgrades featuring modern enclosures.
Types of shower enclosures by material

The material you choose for your shower enclosure affects everything from daily maintenance to long-term durability and overall cost. Each option brings distinct advantages and limitations that suit different budgets, design preferences, and usage patterns. Understanding these differences helps narrow down your choices before diving into specific styles and configurations.
Glass shower enclosures
Glass remains the premium choice for shower enclosures, offering unmatched clarity and durability when properly maintained. Tempered safety glass, which shatters into small, rounded pieces rather than sharp shards, comes standard in thicknesses from 3/8 inch to 1/2 inch. Clear glass creates an open, spacious feel ideal for smaller bathrooms, while frosted or textured options provide privacy without sacrificing light transmission. Low-iron glass, though pricier, eliminates the greenish tint found in standard glass for crystal-clear views. The main trade-off comes in maintenance—glass shows water spots and soap scum readily, requiring regular squeegee use or protective coatings to maintain that showroom sparkle.
Acrylic and fiberglass options

Acrylic and fiberglass shower enclosures offer budget-friendly alternatives that weigh significantly less than glass, making DIY installation more feasible. Acrylic panels resist impacts better than glass and retain heat effectively, creating warmer shower environments. These materials come in various colors and can include built-in shelving and seating molded directly into the panels. Fiberglass options cost even less but tend to flex under pressure and may yellow over time. Both materials scratch more easily than glass but hide water spots better, requiring less frequent cleaning. Modern manufacturing techniques have improved their appearance considerably, though they still lack the premium feel of glass installations.
Frameless vs framed designs
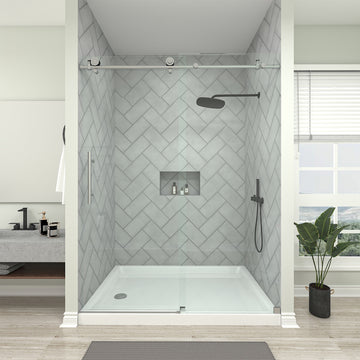
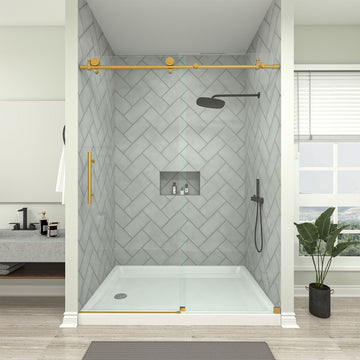
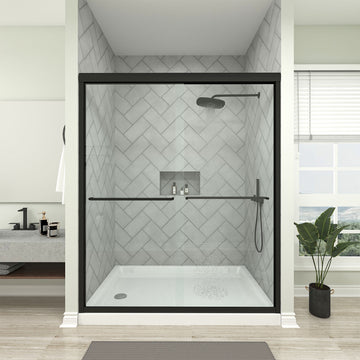
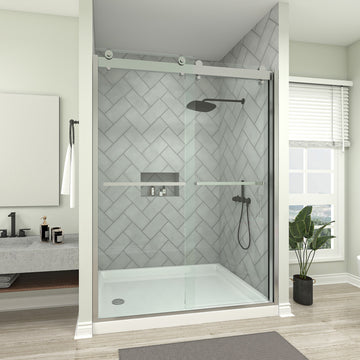
The amount of metal framing dramatically changes both the look and price of shower enclosures. Framed designs use aluminum or steel channels around all glass edges, providing maximum stability at the lowest cost—typically 40-50% less than frameless options. Semi-frameless enclosures strike a middle ground, featuring frames only around the outer edges while leaving door edges exposed for a cleaner appearance. Frameless shower enclosures represent the luxury end, using thicker glass (usually 1/2 inch) and minimal hardware for an almost invisible barrier. While frameless designs create stunning, spa-like aesthetics and easier cleaning with fewer metal joints collecting grime, they require precise installation and stronger wall support, driving up labor costs significantly.
Popular shower enclosure styles
Selecting the right shower enclosure style depends on your bathroom's layout, available space, and how you move through the room daily. Modern manufacturers offer configurations for every scenario, from compact corner units that maximize floor space to luxurious walk-in designs that eliminate doors entirely. Each style addresses specific spatial challenges while contributing to your bathroom's overall aesthetic.
Corner shower enclosures
Corner shower enclosures transform unused bathroom corners into functional shower spaces, making them ideal for smaller bathrooms or powder room additions. These units typically feature two glass walls that meet at a 90-degree angle, with entry through curved (neo-angle) or straight doors. Neo-angle designs with angled front panels create more elbow room inside while maintaining a compact footprint—perfect for bathrooms under 40 square feet. Square and rectangular corner units fit snugly against two walls, leaving the rest of the bathroom open for other fixtures. Pentagonal and quadrant shapes with curved fronts soften the bathroom's geometry while preventing bumps against sharp corners in tight spaces.
Walk-in shower enclosures
Walk-in enclosures eliminate doors completely, using a single fixed glass panel to partially shield the shower area while leaving one side open for entry. This barrier-free design works brilliantly in larger bathrooms where you have at least 36 inches of clearance for the opening. The minimal structure creates an airy, spa-like atmosphere and proves especially practical for users with mobility concerns or those who simply hate dealing with shower doors. Wet room designs take this concept further, waterproofing the entire bathroom floor and using subtle slopes to direct water toward drains. The main consideration involves splash zones—without full containment, these enclosures require strategic showerhead placement and potentially larger bathroom layouts to prevent water from reaching dry areas.
Sliding door enclosures
Sliding (bypass) door enclosures solve the classic problem of door clearance in tight bathrooms where swinging doors would hit toilets, vanities, or walls. Two or three glass panels glide along top and bottom tracks, with overlapping sections providing entry without requiring any outward space. Modern soft-close mechanisms prevent slamming, while improved roller systems eliminate the jerky movement common in older models. These enclosures work particularly well for bathtub conversions and alcove installations where the shower fits between three walls. The trade-off comes in cleaning—tracks collect soap scum and require regular attention to prevent buildup that impedes smooth operation.
Pivot and hinged door options
Pivot and hinged doors offer the widest possible entry into shower enclosures, typically opening 90 degrees or more for comfortable access. Hinged doors attach directly to walls or frames with visible hardware, swinging outward like traditional doors—though some models allow inward swing for unique layouts. Pivot doors rotate on pins positioned at the top and bottom of the door, requiring less wall support and creating a floating appearance that suits contemporary designs. Both styles demand adequate clearance in front of the shower (usually 30-36 inches) but provide superior accessibility compared to sliding options. Premium models feature reversible installation for left or right opening and adjustable hinges that compensate for walls that aren't perfectly plumb.
How to choose the right shower enclosure
Choosing the perfect shower enclosure involves balancing your bathroom's physical constraints with your budget, style preferences, and daily needs. The wrong choice can lead to costly mistakes—from doors that bang into toilets to enclosures that overwhelm small spaces or fail to contain water properly. Taking time to evaluate these factors systematically prevents buyer's remorse and ensures your new enclosure enhances rather than complicates your bathroom routine.

Measuring your bathroom space
Accurate measurements form the foundation of successful shower enclosure selection, starting with the overall bathroom dimensions and available shower area. Measure the intended shower space at three heights—floor level, midpoint, and ceiling—since walls often aren't perfectly straight. Document ceiling height, noting any slopes, fans, or light fixtures that might interfere with taller enclosures. Consider door swing clearances carefully, accounting for at least 24 inches of outward swing space for hinged doors without hitting fixtures, walls, or impeding bathroom traffic flow. Don't forget to measure doorways and stairwells along the delivery path—many homeowners discover too late that their dream enclosure won't fit through the bathroom door. Mark existing plumbing locations and check whether walls are load-bearing if considering heavy frameless glass, as some walls require reinforcement to support 150+ pounds of glass per panel.
Budget considerations
Shower enclosure costs vary dramatically, from $200 basic framed units to $5,000+ custom frameless installations. Beyond the enclosure itself, factor in installation (typically $300-$1,500), potential plumbing modifications ($200-$800), and any necessary bathroom prep work like releveling floors or reinforcing walls. Frameless designs cost 2-3 times more than framed alternatives but may return higher resale value in upscale neighborhoods. Consider long-term expenses too—cheaper acrylic units may need replacement in 5-10 years, while quality glass enclosures last decades with proper care. Many retailers offer financing options for premium enclosures, though paying cash often secures 5-10% discounts from local suppliers eager to avoid credit card processing fees.
Installation requirements
Professional installation typically proves worthwhile unless you have significant DIY experience with plumbing and glass handling. Frameless enclosures absolutely require professional installation due to precise measurements and specialized drilling equipment for mounting hardware into tile or stone. Check whether your bathroom's water supply and drain locations align with standard enclosure configurations or need expensive rerouting. Waterproofing represents another critical factor—proper installation includes waterproof membranes behind wall panels and correctly sloped floors to prevent water damage. Some installations require electrical work for features like steam generators or LED lighting, necessitating licensed electricians. Always verify that installers carry proper insurance and offer warranties on their work, as water damage from improper installation can cost thousands to remediate.
Maintenance and cleaning factors
Different enclosure materials and designs create vastly different cleaning commitments that impact your weekly routine. Glass enclosures with protective coatings like ClearShield or EnduroShield repel water and soap scum but cost 15-20% more upfront. Frameless designs eliminate metal tracks where mold accumulates but require squeegeeing after each use to prevent water spots on exposed glass edges. Consider your household's actual cleaning habits honestly—beautiful clear glass looks terrible when neglected, while textured or frosted glass hides water marks between cleanings. Sliding door tracks need monthly deep cleaning to prevent buildup that impedes movement, while pivot doors just need occasional hinge lubrication. Factor in accessibility for cleaning—can you comfortably reach all surfaces, or will the back corners become grimy zones you'll avoid? Some homeowners find that darker frames and treated glass reduce visible soap scum, making maintenance feel less overwhelming.
Installation and maintenance tips
Professional vs. DIY installation
Professional installation costs $300-$1,500 but prevents expensive mistakes. Installers handle permits, waterproofing, and warranty issues. They also have the right tools for drilling into tile without cracking it.
DIY installation works for basic framed kits with clear instructions. You'll need a level, drill, silicone sealant, and a helper for glass panels. Never attempt frameless installation yourself—the glass requires precise alignment and special hardware. One measurement error can crack expensive panels.
Most manufacturers void warranties on self-installed products. If you go DIY, have a professional plumber check your waterproofing before closing up walls.
Common installation mistakes to avoid
The biggest mistake is rushing measurements. Walls aren't always straight, so measure at multiple points. Being off by even 1/4 inch can prevent doors from closing properly.
Skip the included wall anchors—use proper toggle bolts or mount into studs. Standard anchors pull out under the weight of glass doors. Always predrill holes in tile with diamond-tipped bits to prevent cracks.
Don't forget about slope. Shower floors need a 2% grade toward the drain. Water pooling in corners leads to mold and eventually leaks into walls.
Never install glass panels directly on tile. Use setting blocks to create a small gap for drainage and movement. Seal every joint thoroughly but leave weep holes at the bottom for trapped water to escape.
Cleaning and maintenance best practices
Squeegee glass after every shower to prevent water spots. This takes 30 seconds but saves hours of deep cleaning later. Keep a small squeegee on a hook inside the shower.
Clean weekly with a 50/50 mix of white vinegar and dish soap. Spray it on, wait five minutes, then rinse. Avoid abrasive cleaners that scratch glass and damage protective coatings.
Inspect door seals monthly. Replace them when they start looking worn or water leaks through. Most seals cost under $20 and install in minutes.
Clean sliding door tracks with an old toothbrush and baking soda paste. Vacuum out debris first. Apply silicone spray to rollers every three months for smooth operation.
Check caulk lines every six months. Scrape out and replace any cracked or moldy sections immediately. Small caulk problems become big water damage fast.
Conclusion
Choosing the right shower enclosure transforms your daily routine and bathroom's value. Take time to measure carefully, set a realistic budget, and pick a style that matches your space and lifestyle.
Glass enclosures offer elegance but need regular cleaning. Acrylic saves money but may not last as long. Frameless designs look stunning in modern bathrooms, while framed options provide stability at lower cost.
Consider your bathroom's size first. Corner enclosures maximize small spaces. Walk-ins create luxury but need room. Sliding doors work in tight spots where swing doors won't fit.
Professional installation costs more upfront but prevents water damage and ensures proper warranty coverage. Good maintenance habits keep any enclosure looking new for years.
Whether you're upgrading an outdated bathroom or building new, the right shower enclosure makes every morning better. Match your choice to your needs, not just trends, and you'll enjoy the results for years to come.
