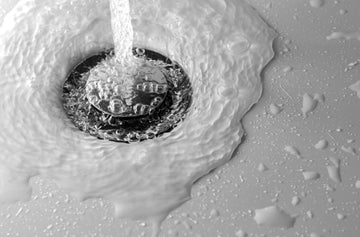


Whether you’re swapping a worn stopper, fixing a slow drain, or prepping for a new trim kit, learning how to remove bathtub drain hardware is a straightforward DIY that saves time and money. The key is identifying your drain style first—lift-and-turn, toe-touch, push-pull, or trip-lever/overflow—because each uninstalls a little differently. With the right tools and a few precautions to protect your tub’s finish, most jobs take 20–40 minutes.
In this guide, you’ll learn how to spot your drain type at a glance, which tools actually make removal easy (hello, drain key and plug wrench), and how to break loose stubborn, sealed threads without cracking the crossbars. We’ll cover step-by-step removal, quick cleanup and resealing tips, and when it’s smarter to call a pro—like when corrosion, stuck linkages, or damaged threads show up. Grab a towel to pad the tub, flip on good lighting, and let’s get your drain out cleanly and safely.
Different types of bathtub drains and how to identify yours
Not all tub stoppers come off the same way. Identifying your drain style first makes how to remove bathtub drain steps faster and safer. Here are the most common types and simple ways to spot each one.

Trip-lever with pop-up stopper
-
how it works: a lever on the overflow raises a rocker arm that lifts a separate stopper in the drain.
-
what you’ll see: a lever on the overflow plate and a visible stopper you can lift out of the drain opening.
-
quick ID tip: if you have a lever on the tub wall and a removable stopper in the drain, it’s this style.
Lift-and-turn
-
how it works: lift the knob slightly and twist to open/close.
-
what you’ll see: a small knob on top; often a tiny set screw on the side of the knob or under a decorative cap. When lifted, you may see a threaded stem.
-
quick ID tip: if twisting changes the position, it’s lift-and-turn. Look for the set screw that secures the cap to the stem.
Push-pull
-
how it works: push down to close, pull up to open. No twisting needed.
-
what you’ll see: a center knob you tug upward; cap may unscrew from a threaded post.
-
quick ID tip: try pressing and then pulling—if it toggles without turning, it’s push-pull.
Toe-touch (tap-to-close)
-
how it works: spring-loaded cap toggles with a press of your toe.
-
what you’ll see: a low, flat cap with no knob; a soft spring feel when you press.
-
quick ID tip: press the cap—if it pops down and up, you’ve got toe-touch. The cap typically spins off the post by hand.
Trip-lever with internal plunger (no visible stopper)
-
how it works: the lever controls a plunger hidden in the waste pipe that blocks flow.
-
what you’ll see: an overflow lever, but the drain opening looks clear or has a simple strainer—no pop-up piece.
-
quick ID tip: operate the lever and listen—you’ll hear the linkage move inside. Removal involves the overflow plate and linkage rather than the drain cap.
Grid strainer (no built-in stopper)
-
how it works: a fixed grate covers the drain; you use a separate rubber stopper when needed.
-
what you’ll see: a metal grid with small holes and visible crossbars inside the drain throat.
-
quick ID tip: if you see crossbars and no moving parts, it’s a strainer. You’ll remove the drain flange itself to replace or clean.
Flip-it or toggle-style
-
how it works: an oval toggle on the cap flips to open or close.
-
what you’ll see: a side-to-side toggle built into the cap.
-
quick ID tip: if you can flick a small toggle, you’ve got a flip-it. Many of these pull out without tools.
Visual cues to confirm your type
-
look at the overflow: a lever means a trip-lever system; a plain plate without a lever suggests a non-lever style.
-
test the motion: twist, push, or pull the cap. The action that changes water flow usually identifies the type.
-
inspect for set screws: use a flashlight to spot tiny set screws on the side of the knob or under a decorative cover.
-
peek inside the drain: crossbars indicate an older strainer or a flange you’ll remove with a plug wrench; a central threaded post suggests a cap that spins off.
-
note the cap profile: flat, springy caps are toe-touch; taller knobs are lift-and-turn or push-pull.
Compatibility and sizing basics
Most tub drain flanges are 1.5 inch nominal with standard threads; trim kits are widely compatible, but always check your brand and measurements before ordering.
If your tub has an unusual or very old drain (no threads, cracked crossbars, or heavy corrosion), plan on a specialized tool or a full flange replacement rather than just swapping the stopper.
Knowing your drain style upfront helps you choose the right tool and technique, avoid damaged threads, and make the next step—how to remove bathtub drains—smooth and stress-free.
How to remove bathtub drains
Once you've identified your drain type, gather the right tools and follow the steps below. These instructions cover stopper removal and drain flange removal—choose the path that fits your project.

What tools and materials do you need
-
Drain key or tub drain wrench (plug wrench): fits inside the flange to grab crossbars without cracking them
-
Flathead screwdriver: for set screws, prying caps, and light prying
-
Needle-nose pliers: grip threaded posts or pull hair clogs
-
Hex key set: many lift-and-turn stoppers use small Allen set screws
-
Adjustable pliers or channel locks: for stubborn flanges; pad jaws with tape
-
Flashlight or headlamp: spot set screws and threads clearly
-
Old towel or mat: protect the tub surface and catch dropped parts
Helpful extras and materials
Penetrating oil like PB Blaster or Liquid Wrench loosens corroded threads—apply it 10–15 minutes before removal. Keep plumber's putty or silicone sealant and teflon tape on hand to seal and wrap threads on the new drain. A hair removal tool or zip-it clears clogs before reinstalling, and a bucket with rags handles water, old putty, and debris.
Replacement parts (if upgrading or repairing)
-
Replacement drain flange kit: includes flange, gasket, and sometimes a shoe adapter; universal 1.5-inch kits fit most tubs
-
New stopper assembly: match your style or upgrade to toe-touch or grid strainer
-
Overflow plate and linkage: for trip-lever systems that need new linkage or conversion
-
Rubber gasket or fiber washer: seals the drain to the tub underside
Removing the stopper (cap and trim only)
If you're only swapping the visible stopper and not the drain flange itself, start here. Lay a towel in the tub and turn on bright lighting so you can see clearly.
-
Identify and access the fastenerl: Look for a small set screw on the side of the knob or hidden under a decorative cap. Lift-and-turn stoppers almost always have one. Use a hex key or small flathead to loosen the set screw, then lift the knob straight up. The stopper body will twist off the threaded post counterclockwise.
-
Remove based on your drain type: Push-pull stoppers work similarly—pull the knob up as far as it goes, then turn counterclockwise. Some models have a set screw, so check under the cap first. Toe-touch stoppers are the easiest: press the stopper down, then turn the entire cap counterclockwise by hand until it spins off the post in a few turns. Trip-lever pop-up stoppers lift straight out of the drain—just grab and pull up. The overflow linkage stays in place unless you're also removing that assembly.
-
Clean and inspect: Wipe the threaded post and drain opening clean. Check for cracks, stripped threads, or heavy buildup. If the post is damaged, you'll need to remove the entire drain flange.
-
Install the new stopper: Thread the stopper body clockwise onto the post until snug, then add the knob and tighten any set screws. Test the open and close action a few times to make sure it seals properly.
Removing the drain flange (full drain removal)
Use these steps when replacing the entire drain assembly, fixing leaks, or accessing the trap.
-
Remove the stopper and clear debrisl Follow the stopper removal steps above so you can see the drain flange and crossbars clearly. Use needle-nose pliers, a zip-it tool, or tweezers to pull hair and gunk from the drain throat. This prevents clogs from falling deeper into the trap during removal.
-
Apply penetrating oil if needed: If the flange looks corroded or hasn't been removed in years, spray penetrating oil around the threads where the flange meets the tub. Wait 10–15 minutes to let it soak in and break down rust or old sealant.
-
Insert the drain key or plug wrench: A drain key has prongs or lugs that fit into the crossbar slots inside the flange. Insert it firmly, making sure the lugs engage both crossbars to distribute force evenly and avoid cracking them. This is critical—uneven pressure will snap the crossbars and make removal a nightmare.
-
Turn counterclockwise to loosen: Use steady, controlled pressure and turn counterclockwise. If the flange won't budge, tap the wrench handle gently with a rubber mallet to break the seal, then try again. Avoid excessive force on one side. If you don't have a drain key, you can insert the handles of needle-nose pliers or small channel locks into opposite crossbar slots, squeeze the handles together for grip, then twist counterclockwise. Pad the plier jaws with electrical tape to avoid scratching.
-
Lift out the old flange: Once loose, unscrew by hand and lift the flange out. You'll see old plumber's putty, a rubber gasket, or silicone around the underside. Scrape away old sealant with a plastic putty knife—avoid metal scrapers that can scratch porcelain or acrylic.
-
Clean the drain opening: Wipe the tub drain hole and the exposed pipe threads with a rag and rubbing alcohol or a mild cleaner. Inspect the threads on the drain shoe (the pipe stub below the tub). If they're stripped or damaged, you may need a no-thread replacement adapter or a pro.
-
Prepare the new drain flange: Roll a rope of plumber's putty about ½ inch thick and press it onto the underside flange lip, or apply a bead of silicone if your kit recommends it. Some kits include a rubber gasket—place it on the underside of the flange instead of putty. Wrap the threads of the flange with 2–3 turns of teflon tape, clockwise when viewed from above.
-
Install the new flange: Press the flange into the tub drain hole, seating it evenly. From below (if accessible) or using the drain key from above, thread the flange clockwise into the drain shoe. Tighten snugly but don't overtighten—acrylic and fiberglass tubs can crack. Excess putty will squeeze out around the edge; wipe it away with a damp rag.
-
Let sealant cure and reinstall stopper: If you used silicone, wait 24 hours before using the tub. Plumber's putty sets faster but still benefits from a few hours of cure time. Thread the new stopper assembly onto the post and test the open and close action. Adjust the set screw or knob height if needed.
Removing trip-lever linkage and overflow (if applicable)

Trip-lever drains require removing the overflow assembly to access or replace the internal linkage. Use a flathead or Phillips screwdriver to remove the two screws holding the overflow plate to the tub wall. Gently pull the plate and attached linkage rod straight out of the overflow pipe—it may be 12–18 inches long with a plunger or rocker arm at the end. Remove hair wrapped around the linkage and check for bent rods, worn springs, or broken pieces. Replace the entire assembly if damaged.
To install new linkage, feed the new rod and plunger into the overflow pipe, adjusting the length per the kit instructions (usually a threaded adjuster or multiple mounting holes on the plate). Reattach the cover plate with screws but don't overtighten against porcelain. Fill the tub a few inches and operate the lever—the stopper should seal fully when closed and drain freely when open. Adjust linkage length if needed.
Pro tips and troubleshooting
Don't force it—if a flange won't budge after penetrating oil and moderate effort, applying heat with a hair dryer on low around the drain can help break old putty seals. Always protect the finish by padding tools and your work surface; porcelain and acrylic scratch easily. If you have access through a crawl space or removable panel, loosening the drain shoe nut from below is often easier and safer than forcing the flange from above.
Replace gaskets every time—old rubber gaskets lose their seal, so always use the new gasket included with replacement kits. Mind the tub material: cast iron and steel tubs tolerate more torque, but acrylic and fiberglass need gentler handling to avoid cracks.
If a crossbar breaks, use locking pliers to grip the remaining flange edge, or carefully score the flange with a hacksaw blade (protect the tub) and collapse it inward. For stripped threads, a drain removal tool with expanding jaws can sometimes grip damaged threads; otherwise, cut the flange and replace the shoe. Stuck putty or old sealant responds well to warm soapy water and a plastic scraper—avoid harsh chemicals that can damage tub finishes.
When to call a pro
Most bathtub drain removals are straightforward DIY jobs, but some situations call for a professional plumber to avoid damage or safety issues.
Call a pro if you encounter heavily corroded or stripped threads that won't budge even after penetrating oil and careful effort—forcing it risks cracking the tub or damaging the drain shoe beyond repair. If the crossbars break and you can't grip the remaining flange safely, or if the drain flange is glued or caulked so aggressively that removal threatens the tub finish, a plumber has specialized extraction tools and experience.
Access issues also matter. If your tub has no underneath access and the drain won't unscrew from above, a pro can work through the overflow or cut and replace the assembly safely. Leaks below the tub, damaged or rotting subfloor around the drain, or cracked drain shoes that need replacement all require underneath work that's often easier and safer with professional help.
If you're dealing with cast iron, steel, or vintage tubs with non-standard drain sizes and odd thread pitches, or if local codes require permits and inspections for drain work, hiring a licensed plumber ensures compliance and warranty protection. Finally, if you're uncomfortable working with plumbing, lack the right tools, or simply want peace of mind, a pro can handle removal and installation in under an hour for a reasonable service call.
All in all
Learning how to remove bathtub drain hardware gives you control over repairs, upgrades, and deep cleaning without waiting on a plumber. Whether you're swapping a worn stopper, replacing a corroded flange, or clearing a stubborn clog, the process comes down to identifying your drain type, using the right tools—especially a drain key for flange removal—and working carefully to protect your tub's finish. Most jobs take 20–40 minutes and require only basic hand tools, a little patience, and proper prep.
If you run into broken crossbars, stripped threads, or access challenges, don't hesitate to call a pro—some situations simply aren't worth the risk of tub damage or injury. For straightforward swaps and standard drains, though, you've got this. Keep your workspace clean, take your time, and enjoy the satisfaction of a smooth-draining tub you fixed yourself.
FAQs
Can I remove a bathtub drain without a drain key or special tool?
Yes, but it's harder and riskier. You can insert the handles of needle-nose pliers or small channel locks into opposite crossbar slots, squeeze for grip, and turn counterclockwise. Pad the jaws with electrical tape to avoid scratching. Another option is using a flathead screwdriver wedged against the crossbars for leverage, but this increases the chance of cracking them. A drain key costs around $10–15 and makes removal much safer and faster, especially on older or corroded drains.
Why won't my bathtub drain unscrew, and what should I try?
Corrosion, old plumber's putty, or dried sealant often locks the threads. Apply penetrating oil around the flange threads and wait 10–15 minutes, then try again with steady pressure. Gently tapping the drain key handle with a rubber mallet can break the seal without cracking crossbars. If the drain still won't budge, try warming the area with a hair dryer on low to soften old putty. Avoid excessive force—if these steps don't work, the threads may be stripped or the flange damaged, and a pro with extraction tools is your best bet.
How do I know if I need to replace the whole drain flange or just the stopper?
If the visible stopper is worn, sticks, or won't seal but the drain itself isn't leaking and the threads are intact, you only need a new stopper. If you see water pooling under the tub, rust stains around the drain, cracked crossbars, stripped threads on the post, or corrosion on the flange, replace the entire drain assembly. Also replace the flange if you're upgrading finishes (chrome to brushed nickel) or switching drain styles (lift-and-turn to toe-touch). When in doubt, remove the stopper and inspect—damaged threads or visible cracks mean a full flange replacement is needed.